Sharing An iPhoto Library
It is sometimes desirable in a setup where more than one user uses a given machine to be able to have multiple users work on a shared iPhoto library, eliminating the need to have a seperate copy of the library for each user. Unfortunately, this capability was not kept in mind when iPhoto was designed. There does not exist a perfect solution for sharing a library between multiple users, but iPhoto Library Manager has tools that can at least help ease the process.
Permissions and iPhoto
In Mac OS X, every file on the system is owned by one of the users on the system. Any files created by one user cannot be modified by another user unless that user is given permission to do so. So for instance, if the user "bob" creates an iPhoto library, and another user "susan" wants to be able to modify that library, bob must first change the permissions of the files in the library so that susan can modify them. If bob and susan are in the same group, then setting the "group" permissions for a file will allow them both to access it, no matter who owns it. If they are not in the same group, then setting the "other" permissions allow them to share the file. You can see the current owner, group, and permissions for a file by selecting it in the Finder and selecting the Get Info command from the File menu.
Changing these permissions is easy enough, and can be done in the Finder or through the Terminal. However, any new files or folders that are created by iPhoto will be given the default permissions (readable and writable by the owner, but only read access for the group and other users), so those new files and folders will not be accessible by other users. Additionally, when multiple users start to use a library, the library will start to have a mix of files that are owned by different users on the system. As can be seen, the situation quickly becomes very difficult to manage.
iPhoto Library Manager provides a couple different ways of changing permissions. Click on the "Options..." button in the main window, and you will see a sheet with three pop-up menus that allow you to configure what permissions you would like to be set for the files inside the selected library. You can press the "Apply Permissions Now" button to change the permissions of the entire contents of the library. If there are files or folders within the library whose permissions cannot be set, a window will come up displaying which files couldn't be changed. You can turn off this warning by clicking "Don't warn me again", or in the Preferences. The current permissions of the library folder are also displayed next to the pop-up menus.
You can also check either of the two checkboxes below to have iPhoto Library Manager automatically apply the permissions when iPhoto launches or when iPhoto quits. This way, you can make sure the permissions are correctly set both before and after you work with a particular iPhoto library. Note that iPhoto Library Manager must remain open in order for it to be able to set these permissions automatically, and it will not display warnings for permissions that could not be set when auto-changing permissions in this way.
Ignoring permissions
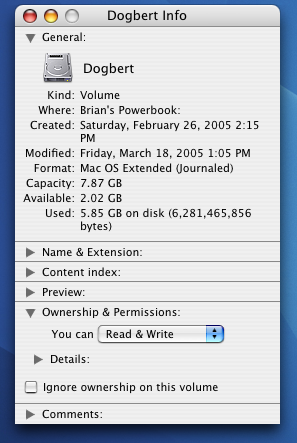 There is one other way to get around the issue of permissions in sharing a library. In Mac OS X, you can tell the system to ignore all permissions on a particular drive or partition (this cannot be done with the volume that your computer is running OS X from). To do so, select the drive in the Finder and press command-I (Get Info). In the info window, click the disclosure triangle next to "Ownership & Permissions", and then check the box that says "Ignore ownership on this volume" (note: you may be prompted to enter an admin password when doing this). This will allow all users to read and write files on that drive regardless of how permissions are set. One drawback to this approach is that it requires either a) storing your library on an external drive, or b) formatting and partitioning your main hard drive, which requires backing up and reinstalling your data and applications. After setting up the drive you want to use, either create a new library on the drive by clicking "New Library" in iPhoto Library Manager, or copy one of your existing libraries to the drive and then add it to iPhoto Library Manager by clicking "Add Library".
These are far from perfect solutions to the problem (that's something that would need to be implemented by Apple as part of iPhoto), but hopefully one of them should be workable if you want to share a single library among multiple users.
See also: